running top

I’m not super into making my own activewear. Good patterns seem to be few and far between, not to mention the trouble sourcing appropriate fabric and home sewing machine’s limited capabilities of producing quality, professional finishes… Mostly, I don’t find it worth the effort. However, I had been looking for a long sleeve top and just couldn’t find what I wanted. I wanted a simple non-hooded, non-funnel neck top with sleeves that are actually long enough for my monkey arms.

These are actual post-run photos, fyi. Not that I’m super vain about my looks, but whatever. 😛

IMG_5510

I ordered some dri-fit knit fabric from Koshtex and decided to sew up the Lane Raglan by Hey June. A while back she added a few features to the basic tee, and now you also get pattern pieces for a hood and deep cuffs with thumb holes. I didn’t need the hood for this top, but the cuffs with thumb holes? YES. Instead of using body measurements for choosing a pattern size, she has the finished measurements listed so you can choose the amount of ease according to what fabric you are using. My current measurements are about 34″-28″- 39″ so I picked the size S, grading out to a L at the hip. It ended up being a bit larger than I wanted, so I trimmed down the sleeve and side seams by 1/4″ (removing 1/2″ from the sleeves and 1″ from the body in total), but left the hip at the original width.

IMG_5531

Instead of the regular neck band, I did a narrow bound edge. I really like this finish, and it ends up being a little smoother on the inside, which is important for activewear. Also, instead of a hem band, I lengthened the CF by 2 1/2″, and the CB by 3″ to create a curved hem. I prefer my running tops to be nice and long, and I have a thing for curved hemlines.

IMG_5516

I usually have to lengthen sleeves, but these were perfect as is. In fact, I had originally added 1/2″, but it was too much and I had to go back and remove the cuffs and cut off the extra sleeve length. The thumb hole cuffs are just fantastic for running. Now that it’s getting quite chilly in the mornings, I wear a fleecy pullover but, natch, the sleeves are too short. These cuffs help tremendously in keeping out the chill.

I think if I make another running top from this pattern, I will add a CB seam to help remove the excess fabric that pools at my lower back. It’s not a big deal, and frankly it looks worse just standing there in photos than when I’m moving around, but I’d really prefer a slimmer cut. Now I did try the Fehr Trade Surf to Summit Top last winter, which has princess seaming for shaping, but in the end I just didn’t enjoy wearing the top; the fit was slightly off and the raised neckline was very uncomfortable. I can usually make alterations to get things to work, but raglan seaming throws me!

IMG_5511

All in all, this is a successful top, and the fabric is great! I’ll definitely be ordering from them in the future—the prices are very reasonable and the shipping was super fast. I placed my order on a Friday afternoon and it was on my doorstep by the following Monday. Love that!

lisa g.

Halloween 2015

Oh goodness, did I get piled on this year for Halloween! The entire month of October was spent sewing costumes for the kiddos. It’s not that I don’t love dressing them up for the occasion, but the planning and plotting is so much more fun than the actual doing!

Oliver waffled between many, many ideas, but in the end went with a construction worker. He loves to build things, put stuff together, help with home maintenance, car repairs, you name it. The hardware and auto parts stores are his happy places. All I had to make was a vest, which only took an afternoon and half a yard of fabric. I traced a safari vest pattern from the 3/2015 issue of Ottobre magazine; it already had some pocket details, so it was just a matter of using bright orange fabric and ironing on some reflective tape to get the look I needed.


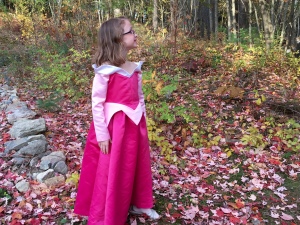
Isabella decided on Sleeping Beauty for her costume. That was slightly more problematic because there are literally no good patterns (in print) for that dress. My kids have come to expect a certain level of authenticity, and I dreaded trying to figure out how to make the shoulder detail work. A desperate google search, however, led me to an out of print Simplicity pattern (5835) from 2002 (I think?). Finally! Um… except that it was listed for $20-30 everywhere I looked. Fortunately, I snagged one on ebay for under $20, because c’mon. It looks perfect. Okay, almost perfect. I really cursed that skirt. Under the peplum, the waistline is gathered. And the only satin I could find in the right color combo was that really heavy poly satin, which was a nightmare to gather. I don’t understand why costume patterns draft such huge skirts for such tiny people! There is over 60″ of width gathered onto a 22″ waistline (!!). If I ever make this again, I would take the time to draft a proper gored circle skirt, because the gathers keep the peplum piece from sitting nicely.


Sylvia decided on the Queen of Hearts from Alice in Wonderland. I was going to try and accurately replicate the dress from the Disney movie, but I stumbled on Simplicty 2834 (also out of print, but still in stores) and thought it looked fun. I probably should have stuck to my original plan, because this one really took a while to make. It has a under dress (with the front chevrons pieced) plus a fully lined coat. Um… didn’t notice how involved the outfit was when we decided on this pattern! The dress has a partially elastic gathered waistline, and pieced circle skirt. I didn’t realize the pattern called for a full lining on the coat (minus the sleeves), so I didn’t buy enough fabric for that. Instead I created a facing for the bodice portion, and used bias tape to finish the coat hem. I had to be super diligent about cutting all the pieces correctly and not mixing up the red and black sections. It took forever to check and double each piece, but fortunately I got it all right on the first try—yay! But holy cow. There were a LOT of pieces to cut for this outfit. So. many. pieces.


Anastasia is a huge Star Wars fan (movies, yes, but also the animated series, as well as the hundreds of books out there!) so she knew she wanted a Star Wars character. She generally dislikes going the well-known or popular route, so she picked Jaina Solo. I used a pants pattern from the 4/2015 Ottobre magazine, which are made in a ponte knit. They’re basically elevated leggings, so pretty easy to make. For the robe I picked up a brown interlock and used Jalie 2919. I kept the shoulder pleats free (because stitching them down is for crazy people) and she was able to cross it in the front, and keep it closed with a strip of black fabric wrapped around her waist. The pattern has narrower sleeves, so I simply re-drew the sleeve to have a wide opening at the wrist.

Now, the light saber was a bit of an issue, because apparently this character (almost always) has a purple light saber. My husband ran to the store Friday afternoon to see what could be cobbled together… He found some bubble wands with purple tubes (talk about luck!) and glued two together. Then he used electrical tape to tape a mini flashlight to the end and voila! Purple light saber! Best part is, we only had to spend $2 and about 30 minutes making it.


And that, my friends, was our Halloween! The kids were so excited about their costumes, and received many compliments. Most of them got a couple different outings with school parties and whatnot, so it’s not like it was all for a short two-hour window on Halloween night. I don’t go all out like this every year, but I’m willing to every once in a while. Let’s just hope they go easier on me next year!


lisa g.