Halloween 2015

Oh goodness, did I get piled on this year for Halloween! The entire month of October was spent sewing costumes for the kiddos. It’s not that I don’t love dressing them up for the occasion, but the planning and plotting is so much more fun than the actual doing!

Oliver waffled between many, many ideas, but in the end went with a construction worker. He loves to build things, put stuff together, help with home maintenance, car repairs, you name it. The hardware and auto parts stores are his happy places. All I had to make was a vest, which only took an afternoon and half a yard of fabric. I traced a safari vest pattern from the 3/2015 issue of Ottobre magazine; it already had some pocket details, so it was just a matter of using bright orange fabric and ironing on some reflective tape to get the look I needed.


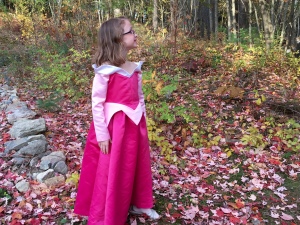
Isabella decided on Sleeping Beauty for her costume. That was slightly more problematic because there are literally no good patterns (in print) for that dress. My kids have come to expect a certain level of authenticity, and I dreaded trying to figure out how to make the shoulder detail work. A desperate google search, however, led me to an out of print Simplicity pattern (5835) from 2002 (I think?). Finally! Um… except that it was listed for $20-30 everywhere I looked. Fortunately, I snagged one on ebay for under $20, because c’mon. It looks perfect. Okay, almost perfect. I really cursed that skirt. Under the peplum, the waistline is gathered. And the only satin I could find in the right color combo was that really heavy poly satin, which was a nightmare to gather. I don’t understand why costume patterns draft such huge skirts for such tiny people! There is over 60″ of width gathered onto a 22″ waistline (!!). If I ever make this again, I would take the time to draft a proper gored circle skirt, because the gathers keep the peplum piece from sitting nicely.


Sylvia decided on the Queen of Hearts from Alice in Wonderland. I was going to try and accurately replicate the dress from the Disney movie, but I stumbled on Simplicty 2834 (also out of print, but still in stores) and thought it looked fun. I probably should have stuck to my original plan, because this one really took a while to make. It has a under dress (with the front chevrons pieced) plus a fully lined coat. Um… didn’t notice how involved the outfit was when we decided on this pattern! The dress has a partially elastic gathered waistline, and pieced circle skirt. I didn’t realize the pattern called for a full lining on the coat (minus the sleeves), so I didn’t buy enough fabric for that. Instead I created a facing for the bodice portion, and used bias tape to finish the coat hem. I had to be super diligent about cutting all the pieces correctly and not mixing up the red and black sections. It took forever to check and double each piece, but fortunately I got it all right on the first try—yay! But holy cow. There were a LOT of pieces to cut for this outfit. So. many. pieces.


Anastasia is a huge Star Wars fan (movies, yes, but also the animated series, as well as the hundreds of books out there!) so she knew she wanted a Star Wars character. She generally dislikes going the well-known or popular route, so she picked Jaina Solo. I used a pants pattern from the 4/2015 Ottobre magazine, which are made in a ponte knit. They’re basically elevated leggings, so pretty easy to make. For the robe I picked up a brown interlock and used Jalie 2919. I kept the shoulder pleats free (because stitching them down is for crazy people) and she was able to cross it in the front, and keep it closed with a strip of black fabric wrapped around her waist. The pattern has narrower sleeves, so I simply re-drew the sleeve to have a wide opening at the wrist.

Now, the light saber was a bit of an issue, because apparently this character (almost always) has a purple light saber. My husband ran to the store Friday afternoon to see what could be cobbled together… He found some bubble wands with purple tubes (talk about luck!) and glued two together. Then he used electrical tape to tape a mini flashlight to the end and voila! Purple light saber! Best part is, we only had to spend $2 and about 30 minutes making it.


And that, my friends, was our Halloween! The kids were so excited about their costumes, and received many compliments. Most of them got a couple different outings with school parties and whatnot, so it’s not like it was all for a short two-hour window on Halloween night. I don’t go all out like this every year, but I’m willing to every once in a while. Let’s just hope they go easier on me next year!


lisa g.

floral blouse | Simplicity 1106

I wanted a quick top out of a rayon challis I picked up on clearance at JoAnn’s recently (seriously, I’ve found some great fabrics there lately!). I was originally going to make something a little more detailed, but the heat and humidity has zapped all the energy outta me. Instead, I decided to sew up a simple kimono sleeve top using Simplicity 1106. There’s nothing groundbreaking or earth shattering about this pattern, it’s just a nice, simple top.

IMG_0690

I made view D, which has a front pocket and cute cutout detail in the back. However, I omitted the cutout because I was afraid it would dip below my bra. I meant to measure the cutout so I could see for future reference but I’ve already folded all the tissue up and put it away… oops.

IMG_0702

I always seem to have a problem with tops being too big on top, so I gambled and traced off an XS at the neckline and bust (I measured at the top of the S range), then graded out to the M for the hem. My shoulders may border on the narrow side (I think? Not sure what the standard is for shoulder width though), and the XS turned out to be perfect. The fit through the hip was a little more fitted than I had anticipated, but that’s partially due to the length of the top, which I cut down. I took 2″ off the hem, and 2.5″ off at the side seams to give it a little more of a shirttail. I think this shortened length is good for either tucking in or leaving out.

IMG_0719

The top isn’t actually tight around my hips, I just have the front tucked in this picture.

I know most people (it seems) have a real hate for facings, but I was pleased to find that that is the method used by this pattern. Of course you could always sub a bias facing if that’s your jam, or if your fabric is on the sheer side. I top stitched the facing at 1/2″ to give it a subtle “design feature” element.

IMG_0674

Overall I’m pleased with this top, though I wish I would have paid more attention when cutting! I managed to get the only dead space of the print front and center, with the brightest flowers cutting into the neckline. Meh. The pattern placement on the back looks great, so I’m really bummed that I didn’t get similar placement on the front. Live and learn!

IMG_0716

I should mention that my shorts are another modified Thurlow made in linen. I loved my first pair so much, that I quickly cut out a second pair, and both have been in constant rotation!

—lisa g.

Easter dress no. 3 | Simplicity 1510

Finally, here is the last Easter dress for this year. My oldest daughter, Anastasia, the only one who actually required a new dress, turns up her nose at anything too girly. She does like dresses and skirts, she just insists that they not be too poofy. We flipped through patterns together, and Simplicity 1510 really caught her eye.

IMG_9397

Purple has always been her favorite color, so when I saw this linen Ikat leaf print at Joanns, I knew she would approve. Like my other girls, she is narrower than she is tall on the sizing chart. She measured about an 8 in width, and 10 in height. I slashed the bodice horizontally and added 1/2″ in length. I kept the armhole depth at the size 8, as she’s built somewhat like me—more petite in the upper body, but longer from the waist down. For the skirt, I simply extended the length down to the size 10.

IMG_9420

This is a cute little pattern, and I love the pleating at the waistline. The bodice hits close to the natural waist in the back, but curves up to a more empire shape in the front. I know it’s difficult to see the details because of the print, so check out the line drawing so you can see the style better.

IMG_9424

The pattern came together very quickly and easily, however, there is an error in the line drawing. It shows that the princess seams should line up with the pleats, but they do not. It does line up with the pleated edge on the inside of the dress, so just be aware of that if you’re looking to make this pattern. Other than that little glitch, I’m very pleased with the pattern! I find that in the McCalls and Simplicity kids patterns, you have to pay close attention to the body measurements (waist, chest, and height!) and ignore the size number. I feel kind of crazy for making a size 8 for my nearly 11-yr old, average-sized daughter, but there you have it. It fits well and she’s sure to wear it often.

IMG_9374

Whew, all that dress sewing just makes me want to sew more dresses… it’s so addictive! Now it’d be great if we could conjure up some Spring weather. The last few patches of snow are just now melting!

—lisa g.

oonapalooza to the max-i dress

a while back when my husband and i were in NYC for a day, i had every intention of hitting up several shops in the garment district. however, we ended up only going to mood fabrics. our time was short and i decided not to torture my husband by taking him into every shop on my list. it’s hard to believe how jam packed that place is until you’re standing there in person! once i got my bearings, i kept coming back to this amazing cotton jersey (this link is to a different colorway, there are several prints on this fabric but looks like they’re going fast). the colors are fantastic and the fabric is soft and beefy. this fabric gets my highest recommendation! it doesn’t have a ton of stretch, but it would be great for anything from tee shirts to dresses.

IMG_3953

initially i had planned to make a simple tank style maxi dress, but i kept having visions of something more dramatic with gathers and a crossover neckline… i pulled out Simplicity 2692, which i made once several years ago and decided it would be perfect. the pattern is for a woven, but my fabric is pretty stable and only required minor adjustments. i omitted the zip and cut the back in a V-shape. i thought it would look cool to cut the bodice on the bias to take advantage of the striping going on in the fabric print.

IMG_3977

the bodice and midriff is fully lined (sans gathers) and i cut my lining pieces on the regular grain line to keep the bodice from stretching out too much. i cut the midriff out of a solid cotton/lycra i had on hand, which just so happened to match my fabric perfectly. WINNING. i also really love the cut of the skirt in this pattern. the hem has a nice full sweep but it gathers only at CF and CB, avoiding unnecessary bulk.

IMG_3948

making this dress happened to coincide with the sewcialists oonaballona-themed july, and as i was finishing up the dress, i realized it was definitely oona-esque (i totally envy her spunk and technicolor wardrobe!). this dress is much louder than my usual makes, but for a summer dress it’s pretty much perfect. i would consider myself more of the wallflower variety, so it’s fun to step outside of my comfort zone. let’s face it—this dress does not blend in.

—lisa g.

fall jacket | simplicity 2534

i have a terrible backlog of projects, but i wanted to get this one on the blog because i’m super in love with how it came out! making my kids’ outerwear has accidentally become a thing around these parts, and my poor daughter anastasia has been wearing one of my a smidge too small for me zip hoodies in lieu of an actual jacket. while she loves wearing it (and i’m pretty sure i’ll never get it back), she needs a “real” jacket. i had a hard time deciding what kind of jacket to make her, but finally went with simplicity 2534.

IMG_1851

i’ve always liked this pattern. it has options: long or short, double or single breasted, mandarin or regular collar, etc—as much as i tend to eschew franchise branded stuff, those project runway patterns really are the best. i decided to go for a trench jacket type look so i picked up a dark purple cotton sateen and a fun animal print lining. after washing the sateen i was concerned that it would end up being too thin and drape-y, and almost changed patterns. but, i stuck with my original plan, and it seems to be just fine. to help increase the structure, i decided to double topstitch my seams. this definitely helped, and i love the look. but you know how i am… TOPSTITCH ALL THE THINGS.

IMG_1844

the pattern doesn’t include separate lining pieces so i used jen’s tutorial to make sure there would be enough ease in the back and at the armholes (a jacket is one of those garments where the lining is slightly larger than the shell). i didn’t draft a paper pattern for the lining, instead i just laid the shell pieces on top of my lining fabric and eyeballed the extra. not my typical modus operandi, but this is one of those cases where it’s okay.

IMG_1863

now for the nitty gritty

sizing: she actually measures around a size 6 in width, but an 8 in height. i considered cutting a 7 and adding length, but i really didn’t have time to fiddle with the pattern so i cut a straight size 8. it is a jacket, and there will be layers underneath, so there was no need to fit it closely.

pattern quirks: the lining. i totally get if they don’t bother with separate lining pieces, i paid $1 for this pattern so i have no reason to be picky. but, like i mentioned above, i went ahead and added the extra ease to the lining to make sure it would be comfortable.

IMG_1861

this jacket has a free-hanging lining. i knew the lining would have to be shorter than the shell pieces, but i couldn’t for the life of me find where the directions said by how much. i searched the directions, and finally i found it listed along with the cutting layout—it says to press the shell pattern pieces up 1″ when you cut the lining. now, i totally did not see that until i searched for it. i read the directions probably 10 times before i finally located the information, and i could easily see someone blowing by that little detail. and, if you’ve never made a jacket before, you may not know to look for it. if you missed that detail, when you go to attach the lining to the facing pieces you would run into trouble and have to go back, unpick your lining hem, and redo. so, just a little PSA if you’re making this jacket.

i added bar tacks at the pocket openings for extra sturdiness.

IMG_1860

aditions: i added a hanging loop because, well duh. i also added stays between the lining and shell (see two thirds of the way down this post for what i’m talking about). the jacket has inseam side pockets and i regret not adding inseam welt pockets at the front panel seaming. oh well…

IMG_1850

everything was easy breezy construction-wise and i managed to sew it up over two days. i did myself a huge favor and, before cutting my fabric, i trimmed down the SA on the pattern to 3/8″. folks. if you’ve never known the singular joy that is sewing with small SA’s, do yourself a favor and try it sometime. i knew i wouldn’t need to make size adjustments, so i was able to just plow through. serious time saver!

IMG_1855

quick note on the topstitching… there were a few places where i wasn’t sure about whether, or how i should go about topstitching, namely the front panel. i ended up topstitching that edge and going up to meet the topstitching at the collar. then i had no interest in hand stitching the hem, so i topstitched that as well, but not across the front because the lining would have been in the way and it didn’t seem right since that part didn’t need hemming. imo, the topstitching gives the jacket a great finish and adds structure to the light-ish weight fabric. all in all i am very pleased with this jacket, and natch she’s in love with it!

IMG_1843

now, off to work on some halloween sewing… the days are ticking by!

—lisa g.