Style Arc | Abby Cardi

We had a serious end of summer heat wave that made me think summer would last forever, but we’ve begun having decidedly chilly mornings (like low 50’s F) so I guess we’re moving on to fall. I stitched up the Abby Cardi from StyleArc because I can never have too many cardigans for layering up. I used a cotton/poly blend interlock from a local store. I usually try to avoid poly blends, but this felt so very soft, and was in the absolute perfect color.

img_3121

The thing I like about this cardigan is that it has a nice drape for the front, but doesn’t overwhelm you with fabric. I also really like how minimal the fabric is in the shawl collar. Sometimes having too much fabric weighing on the back of my neck gives me headaches, and I don’t think I’ll have to worry about that here.

img_3118

The construction is fairly simple, but mitered corners at the shoulder/neck join are always a pain. The instructions don’t mention it, but definitely stay stitch around the corners before snipping into them. With the instructions as vague as they are, it took me a bit of head scratching to figure out where everything was supposed to align. Once I chucked the directions and started working it out on my own, it all came together super fast. I went for a nice clean finish on the collar/facing, and did a nifty burrito roll to encase the neckline seam.

img_3128

The drape front is left with a raw edge, as is the entire hem. I prefer to avoid raw hems when possible, so I added a hem allowance to the back piece so I could hem that part, while leaving the front as is. I think this worked nicely, and I would definitely do it the same way in the future.

Here’s a few detail shots…

img_3135

fold over facing from the inside, raw edge encased

img_3137

added hem allowance to the back piece, front edge left raw

img_3138

hem from the inside

As far as fit is concerned, I added some width from waist to hem on the side seams to accommodate my hips. The shoulder seam is falling off my shoulder a bit (I think I have somewhat narrow shoulders) and I wouldn’t mind an extra inch in sleeve length (I hemmed them at 1/2″ instead of the drafted 1″ to preserve a tiny bit of length). The sleeves were also a touch wide, so I trimmed them down.

img_3109

Overall I’m very pleased with this pattern. The fact that it isn’t a fabric hog is a huge bonus. It was one of StyleArc’s free patterns of the month, and I’m glad I had it on hand when I had the itch for a new cardigan!

lisa g.


TL;DR

PATTERN: StyleArc Abby Cardi
FABRIC: cotton/poly interlock knit from Fabric Basement (local)
SIZE: 8 (measurements for reference: 5’8″/34″/27.5″/39″)
MODS: Added hem allowance to the back piece
ALTERATIONS: added width at the hip, narrowed sleeve
NEXT TIME: bring in shoulder seam, lengthen sleeve

oonapalooza to the max-i dress

a while back when my husband and i were in NYC for a day, i had every intention of hitting up several shops in the garment district. however, we ended up only going to mood fabrics. our time was short and i decided not to torture my husband by taking him into every shop on my list. it’s hard to believe how jam packed that place is until you’re standing there in person! once i got my bearings, i kept coming back to this amazing cotton jersey (this link is to a different colorway, there are several prints on this fabric but looks like they’re going fast). the colors are fantastic and the fabric is soft and beefy. this fabric gets my highest recommendation! it doesn’t have a ton of stretch, but it would be great for anything from tee shirts to dresses.

IMG_3953

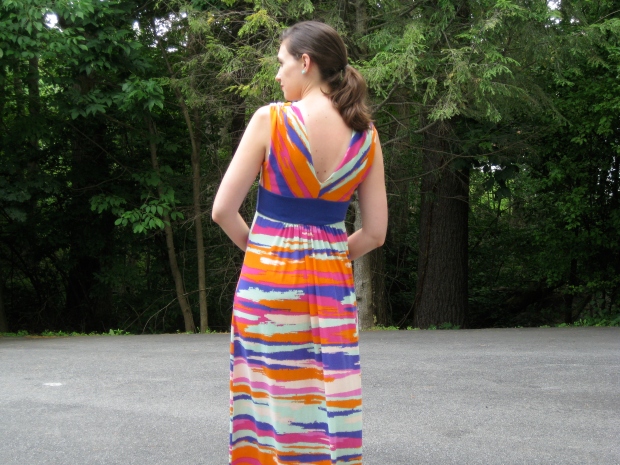
initially i had planned to make a simple tank style maxi dress, but i kept having visions of something more dramatic with gathers and a crossover neckline… i pulled out Simplicity 2692, which i made once several years ago and decided it would be perfect. the pattern is for a woven, but my fabric is pretty stable and only required minor adjustments. i omitted the zip and cut the back in a V-shape. i thought it would look cool to cut the bodice on the bias to take advantage of the striping going on in the fabric print.

IMG_3977

the bodice and midriff is fully lined (sans gathers) and i cut my lining pieces on the regular grain line to keep the bodice from stretching out too much. i cut the midriff out of a solid cotton/lycra i had on hand, which just so happened to match my fabric perfectly. WINNING. i also really love the cut of the skirt in this pattern. the hem has a nice full sweep but it gathers only at CF and CB, avoiding unnecessary bulk.

IMG_3948

making this dress happened to coincide with the sewcialists oonaballona-themed july, and as i was finishing up the dress, i realized it was definitely oona-esque (i totally envy her spunk and technicolor wardrobe!). this dress is much louder than my usual makes, but for a summer dress it’s pretty much perfect. i would consider myself more of the wallflower variety, so it’s fun to step outside of my comfort zone. let’s face it—this dress does not blend in.

—lisa g.

hey june | union st. tee

today i’m a stop on the blog tour for the union st tee just released by Adrianna of hey june patterns (one half of the crafterhours team). she asked me to be a tester and i was more than happy to oblige since 1.) i really need more basic tees and 2.) i’ve had great experiences with her patterns in the past. (see: here, here, here, and here)

paired with an unblogged megan nielsen kelly skirt

paired with an unblogged megan nielsen kelly skirt

i was eager to try out the v-neck variation since i had never made a v-neck tee before.  i picked up a 100% cotton jersey because it’s nice and stable. i wouldn’t dare try it in one of those thin rayon knits with loads of drape. also, i love the way cotton jersey washes and softens over time. it can definitely take the abuse of everyday life.

IMG_3178

the v-neck binding is a little tricky, but the pattern comes with excellent instructions to make it as painless as possible. i ended up with a teeny tiny pucker that no one but me will ever notice. i could have ripped it out, but frankly i probably would have bungled it worse had i tried to fix it.

IMG_3151

BUT WAIT! THERE’S MORE!

that was just my tester version. since i signed up for the blog tour, i thought i’d try out the scoop neck version of the tee as well. i picked up a rayon/cotton jersey from girlcharlee.com (the slinky non-stable type). solid tees are great and necessary, but floral prints are totally my jam. this one is listed as a light to medium weight, but i would put it firmly in the lightweight category. like just a step above the tissue knits. even though it’s lighter weight than i was hoping for, it makes for a great summer tee. plus it goes with my chartreuse shorts. WINNING.

IMG_3504

now, hold onto your hats, cuz i’m about to wax poetic over a t-shirt pattern (i swear, no bribery was involved). so many times i do little more than grumble while making up a knits pattern, be it the giant seam allowances, unpredictable ease, or weird finishing techniques. not so here! and let me tell you why…

  • sizing: you pick your size from the garment’s finished (bust and waist) measurements. this allows you to choose either negative or positive ease, depending on your fabric. since this is a simple tee, you can easily grade between sizes if needed.
  • seam allowance: there is nothing i hate more than giant seam allowances on knit patterns. the SA on this tee is 1/4″, which makes it ideal for serging. BUT it’s also fine for a regular sewing machine, if that’s how you roll. also, it means less fabric waste and a better chance of fitting all the pieces onto less yardage. yeah!
  • neckband: i generally discard neckband pieces since knits have different stretch needs. however, this pattern has two neckband lengths determined by the amount of stretch your fabric has. don’t know how much stretch your fabric has? there’s a handy chart for you to test! for both of the tees i made, the neckband length was perfect.
  • directions: this pattern does not assume that you already know what you’re doing. if you’re a bit unsure or just don’t have a solid grasp on knits sewing, be not afraid.
  • drafting: all the pieces fit together nicely. the sleeve cap has basically no ease, as it should be. it sets in flat quite easily. so easily you barely even need to pin.
  • options: there are sleeve length options, neckline options, neck band width options… no need to guess to make those little customizations.
  • print layout: there’s a chart so you have the option to print off only the pages you need. guys. this i love. once upon a time i made a .pdf pattern where i had to print off over 60 pages, most of which i did not need. and well… i won’t re-hash that saga, but let’s just say that i was not pleased.

IMG_3506

there’s something strangely thrilling about making (and wearing) my own tees. not only are they a quick project, but they get worn all. the. time. if you’re looking for a good tee pattern, or just dipping your toes into the knits game, this one is worth your time!

IMG_3503

there’s lots of great ladies posting on the tour, also up today is Kat at sew chibi. make sure to check it out! need a copy of the pattern? pick it up here.

thanks to Adrianna for inviting me on the tour!

—lisa g.

lane raglan v.3

spring weather around these parts is a bit of a mixed bag. eighty-five one day, 50ºF the next. i made this light sweatshirt-type shirt for those days when i need a warmer layer, but still want to look like spring. again, this is the lane raglan by hey june (clearly, i endorse this pattern!), and the fabric is a cotton interlock from girl charlee. this fabric is crazy soft and comfy, i love it so much!

IMG_2934

i was a little over confident in how much i could fit onto one yard of fabric and nearly didn’t get to make this top! i had to abandon print matching the sleeves to the main body pieces, and i was still short about 1″ in width. i briefly threw in the towel, then got it back out to try again. i arranged it so that only a small part at the underarm of one sleeve was hanging off the fabric. i cut it out, then went back and pieced a scrap on and finished cutting the sleeve.

i always win at fabric cutting.

i used rib knit from joann fabrics as the neck and sleeve/hem bands since interlock doesn’t have the recovery needed for the job. plus the ribbing gives it a more “authentic” sweatshirt vibe. i probably could have stretched the neck band tighter since it’s slightly wavy, but it doesn’t particularly bother me.

IMG_2950

for this version i shortened the hemline by 2″. it works a little better for layering with the shorter length, and, as it turns out, i wouldn’t have had enough fabric anyways. in case you were wondering, these are my jalie jeans that i made a few months ago. i honestly didn’t anticipate them becoming my go to jeans, but they are! my GAP jeans just feel so wrong now, i never reach for them. it’s definitely time for a second pair, but i suspect that won’t happen until fall. or sooner… who knows!

—lisa g.

lane raglan v.2

i knew i’d be making the lane raglan by hey june again… i just can’t resist a raglan sleeve! so last time i made it sweatshirt style, and this time i went more spring/summer. shockingly enough, we are finally hitting 50F on a regular basis! the winter coats can be closeted for a few months. 🙂

IMG_2658

this is another knit fabric from joanns. i’ve come to the conclusion that i will buy a quality knit fabric anywhere i can find it. the thing i hate about online shopping is that often you have to buy in whole yard increments, which drives me nuts for tee shirt making. usually i need just more than a yard to account for shrinkage/hem bands/pattern matching/etc, so i end up with these odd bits leftover that are useless.

IMG_2676

anyways, i’ve never had an issue with joann’s knit fabrics, but this one was terribly off-grain in one section. it was so bad that i wasn’t sure i’d be able to use it for anything other than maybe a gathered skirt. however, with some fancy layouts, i managed to get the front and back cut mostly on-grain. i had to fudge a bit with the sleeves, but i think it all worked out fine!

IMG_2685

i cut the same size as before, except that i shaped the sides and hemline differently. i left the bust area alone, then flared out a bit and added some length. the pattern allows for a hem band, so i added that length plus an inch or two in the front, and two or three in the back. i gave the hem a slight curve so it wouldn’t completely cut me off at the hip.

IMG_2679


i went with short sleeves with a 1.5″ wide hem band. i used to think that raglan tees look funny with short sleeves, but i’ve come to like them finished as i did here.

photo 2


in other news, i finally tried knitting! yeah, it’s april… but i’ll need a bit… okay A LOT of practice before i want to tackle the knitted things i really want to make. initially i started off doing just the knit stitch for each row (which gives you the bumpy rows) but after about three hours of that i was bored off my patootie.

photo 1

i turned to google to search out easy knitted scarf patterns and found this post. being able to switch between knitting and stockinette made things slightly more enjoyable, plus it created a fun pattern. so i’m not gonna say that i’m totally in love with knitting, but i am hoping to add it to my skill set. the hardest part was adjusting to the slow pace, even on something like this that knits up rather quickly—just a few evenings in front of the tv.

the whole world of knitting and following patterns and learning the language is still a bit of a mystery, but i’d like to make a spring weight infinity scarf. any pattern/yarn suggestions for a newbie?

—lisa g.

hemlock tee dress

i was at joann fabrics recently, checking out their knits. nowadays they have a decent selection of rayon jersey that is so very soft and has a nice drape. even though i’m turned off by the exorbitant price, they’re either on sale perpetually or i can use a coupon to soften the blow. i was looking for fabric to make a tunic-length hemlock tee (the super popular FREE hemlock tee pattern), and picked up this cute floral print. i couldn’t pass up this fabric because it has all my favorite things—floral print, navy, red, and green. after thinking about it for a bit, i decided the print would be better suited to a dress, and here it is!

IMG_2625

instead of just cutting and lengthening the hemlock pattern willy nilly, i went and traced out a proper hemlock tee dress pattern. go me! this loose but still cute silhouette should really be my go-to. the volume on top helps to balance my hips, or something. i don’t know, i just really like it on me. plus, in a knit i think it qualifies as secret pajamas, doncha think?

IMG_2620

HOW TO MAKE A HEMLOCK TEE DRESS

depending on how long you want the skirt, you will need 1 3/4 yd fabric (one and a half, if you’re particularly thrifty), and some 1/4″ elastic.

i’m a big fan of building in an elastic casing to the waist seam, so i did some fancy maths (stood in front of the mirror with a tape measure…) and made my best guess about how long to make the bodice. i wanted it to hit 1″ below my natural waist, and blouse slightly. cutting straight across for the bodice usually means that you end up with either some pulling at the bust, or excess volume at the sides. to avoid this, i curved the front waist line down by 1″. if you are especially busty, you may need more length. from the shoulder point at the neckline to the bottom of the bodice should be about 18″ in the front, 17″ in the back. this includes the extra SA for the elastic casing. (note: neither my pattern piece below nor the dress i’m wearing are this exact length. after making it once i determined that 18″ would be the perfect length for me.)

IMG_2794

i also wanted the bust to be more fitted, so i curved the side seam in by 1″ (removing 4″ total) and flared back out to the original side seam at the waist. while doing this, i raised the height of the underarm seam to reduce side boob flashing. i have spindly arms and frequently shorten armhole depth.

since i added in the extra bodice length for the bust, i simply cut a rectangle for the skirt portion. i didn’t want anything overly gathered, so i went with a width slightly more than 1 1/2 times my waist measure. for reference: my waist is 30″ on a bad day, so i needed at least 45″ in skirt width. i cut each skirt piece 24″ wide by 22″ long, which (minus 1″ for 1/4″ SA) gives me a finished skirt width of 47″. this ends up being a couple inches wider than the waist seam on the bodice, but i was able to stretch them to fit when i sewed top and bottom together.

construction is very simple:

  • sew one shoulder seam
  • attach neck binding
  • sew remaining shoulder seam
  • turn 3/4″ hem for the sleeves and topstitch
  • sew bodice side seams and tack SA to the back at the armhole
  • sew skirt side seams
  • attach bodice and skirt with a 3/4″ SA. finish raw edge
  • press SA up and topstitch 1/2″ from seam line, leaving an opening to insert elastic
  • insert elastic and adjust to fit. topstitch opening
  • hem skirt

i love this dress so much, that i already have fabric for another version. since it barely takes more time than a tee shirt, it’s a great one day project. if anyone gives this a shot let me know—i’d love to see it!

lisa g.

what i am wearing to stave off the cold

guys, i don’t know if you’ve heard, but it’s been a flipping long and cold winter here in the northeast US. this is the winter that will not for the love of all that is holy end! since winter is refusing to leave, i made two tops to help keep me toasty warm—a raglan sweatshirt and a cowl neck renfrew.

IMG_2535

for the renfrew, i used a knit blend of some sort (poly/rayon i believe). this is a super cozy top that i’ve been wearing frequently. i love the colors, and it’s super soft and snuggly. what more could i ask for? i made the size 8, which is a roomy fit. since waistlines tend to expand in the winter months i decided to err on the side of roomy…

IMG_2543

the only change i made was to cut the cowl neck as one piece that gets folded in half. i just don’t see the need to have two separate pieces. also, i lengthened the sleeves by making an extra wide cuff, and lengthened the body to omit the hem band. i like the hem band finish, just not for everything.

for the sweatshirt, i used the lane raglan tee put out recently by hey june of crafterhours. i’ve been wanting a raglan pattern, and this one fit the bill. i used one of those cotton interlock knits that have nice stretch, but not so much recovery. i haven’t found that type of fabric terribly useful for most projectes, but for this sweatshirt, it was perfect. the fabric actually came from a box of “too large to throw out” scraps that Gail from Today’s Agenda sent me last summer. i had less than 3/4 yd, which was just enough to eek out this pattern, thanks to the 1/4″ SA’s. then i used contrast ribbing for the neckline and sleeve/hem bands, and even added the little triangle patch for good measure. this i also have been wearing non-stop due to the afore mentioned cold weather.

IMG_2562

miracle of miracles… today is a “warm” (mid-40s F) day! outdoor pics!! no color editing!!!

i happen to really love navy and black together, but i wasn’t so sure if it would look okay paired in the same top. i went for it anyways, and i’m glad i did! i love the monochrome look with this outfit (my skirt, natch, is a moss mini), and the black ribbing sets it off nicely.

IMG_2574

i wanted this sweatshirt to be a little oversized, so i didn’t pay a ton of attention to the fit. when i make it up in a regular jersey, i’ll have to compare it to my renfrew, since this type of fabric is terrible for gauging size. here i cut the small, and the size chart only gives the waist finished measurement. the small has a 33.5″ finished measurement size, and to be honest i was a little thrown for a loop when deciding which one to choose (my actual waist measure is 29″-ish). but like i said, for this sweatshirt i really just wanted a slouchy comfy top!

IMG_2579

given that the cold weather tends to overstay it’s welcome in this part of the universe, i should really make a handful more of each of these. maybe in spring colors so i can pretend it’s not still cold? yeah, that sounds good.

—lisa g.

dixie diy | ballet dress

i haven’t felt much like writing lately, but i do have a backlog of projects to show off! and it’s only natural to start with the last thing i made and work backwards…

IMG_2318

the knit skater dresses have been über popular around the blogs, and for good reason. in the quest for everyday wearable clothes, few things are more comfy than knit dresses. i decided to go with dixie DIY’s ballet dress. and really, how has this pattern not received more love? i’ll give up $4 to avoid drafting my own, that’s for sure. there is only one sleeve length in this pattern (3/4 length) but you could easily shorten or lengthen as needed. i should say, this was probably one of the fastest .pdf files i have ever put together. i managed to cut and tape while playing a rousing game of candy land with my son. multitasking at it’s finest.

IMG_2301

this is the fabric’s actual color

the pattern size chart is simply a list of finished measurements. i find this particularly helpful with knits since the stretch of your knit can vary so widely. i used a grey poly/lycra ponte. i know, i know… ugh polyester… it just felt so nice i thought i’d give it a shot. plus it was only $4/yd. as far as sizing goes, i decided to grade from an XS up top out to a M at the waist. this worked out great, though i have a little bit of pulling on the sleeve at the underarm. the shoulder seam may need to come out a touch, and perhaps the armhole scooped out in the front a tad. the waist seam hits me right at my waist in the back, but hikes up a little in the front. i think next time i’ll add about 1/2″ to the front bodice length. also, i cut the skirt 1″ longer than my size dictated to compensate for my height. these are all minor adjustments, and i’m perfectly content with how this one fits.

IMG_2326

i had planned to do a neck band finish, but when i tried it on for size i was happy with where the neckline was sitting. i decided to bind the neckline edge by serging a strip of fabric to the right side, then wrapping it to the back and top stitching. i was a rebel and used a regular straight stitch. the stitches pretty much disappear into the fabric giving me a nice neat neckline. then i finished off the sleeve and hem with my twin needle.

IMG_2320

i really love this dress and am already plotting several more. i know it’s been said ad nauseam, but this really is a perfect style so if you haven’t sewn one up yet, what are you waiting for?

—lisa g.

burdastyle | ballet wrap top

i’ve thought way too much about how to cleanly finish the hem for a wrap top, so i thought i would share my most successful method. my thoughts on this started with my coppelia wrap cardi and my dissatisfaction with the pattern’s instructions. i like the idea of a hem band because often the knits i would choose for this kind of cardigan would be difficult to hem with a twin needle (since i don’t have a coverhem machine in my arsenal). i was determined to find a better way, and was able to have a second (and third) try on ballet wrap tops i made for two of my girls.

image

i used burda 12/2011 #143 and made a few pattern changes so i could finish all the edges with bands. i cut 2″ off the sleeve hem (and replaced it with a wide cuff), 1″ off the bottom hem, and simply left the neckline as is on the pattern. the pattern has a wrap around edge binding, so adding the band as i did brings the neckline in a little. however, looking at the picture on burda’s model, the neckline looks pretty wide, and adding a neckband band fixed that.

IMG_2132

so here’s how i do the hem band and ties: take the tie pieces and sew the side and one end, and turn them right side out and press (this burda pattern has you do more of a spaghetti strap thin tie, but i prefer the look of a wider tie). the rest you can see in the following pictures.

i love how easy this is, and so much less fiddly than the coppelia instructions.

as far as this particular pattern goes, i made up the girls standard RTW size (i didn’t measure them for size) and the fit is a little bigger than i would have preferred. however, they should be able to get at least two years of wear with these sweaters. the regulation dance wrap sweaters are $20-25 each, and i made two for under $15, with fabric to spare. this is one of those cases where making it was a huge money saver.

as you can see, the sleeves are ridiculously long. in burda’s defense, Isabella is quite small for her age.

image_3

i don’t have any modeled pics of my other daughter, sylvia, but the fit on her is much better. still large, but not comically so. the girls love their sweaters so much, they’ve hardly taken them off since i made them! they have worn it with dresses, leggings, skirts, jeans, you name it. this turns out to be a much more useful sweater than i would have anticipated.

—lisa g.

papercut patterns | coppelia wrap

a while back i began to think that the coppelia wrap from papercut patterns would be a great addition to my wardrobe, in particular to wear with my skirts and over a couple of my dresses. i obsessed for a few days over having a wrap sweater and, before long, caved and put in my order. even though it was coming from the other side of the world, i was super impressed with how quickly it showed up! the fantastic thing about papercut is that they don’t charge extra for shipping. nothing i hate more than finally splurging on a more expensive pattern, only to get hit with an extra $5 in shipping. so, as others have stated, this makes papercut patterns’ pricing comparable to many other indie companies.

IMG_2075

i had a hard time selecting a fabric, but finally found a cotton/rayon/spandex interlock in a nice weight and in that perfect shade of red. i mentally checked off several things in my closet that would match (like my zinnia!), and in the cart it went (purchased locally from fabric basement, $7-ish/yd i believe).

i had pretty high hopes for this pattern, especially after seeing Lladybird’s numerous variations (this one is my fav!). however, my initial reaction to this sweater was one of disappointment. now, i had seen all the other reviews and complaints of this running large and, well, those reviews are certainly to be believed. it’s been a while since i actually sewed this, but i know i went down a full size to start with, and i took off another inch or so at the underarm. i puzzled over this pattern for a while, trying to figure out why it was so large and funnily shaped around the bust/underarm/side area. it seems as though this is drafted more like a dolman top with raglan sleeves. the pic below shows that all the weird pulling goes away with my arm at a 90 deg angle. so, instead of continuing to trim down the side seam little by little, i think perhaps the sleeve/body seams need to be taken in as well. if i alter this one (or make up future versions) i’ll need to do some comparisons to other raglan sleeved patterns.

IMG_2081

p.s. the sleeves are super long! yay for my monkey arms, but maybe not so much for someone shorter…

the slouchy fit seems intentional. however, i just don’t have the bust to fill out any part of the top, so it feels a bit frumpy and unflattering. that said: i’ve worn this quite a bit and only have minimal interest in altering the fit.

other than strange fit issues, i have a few nitpicks with the construction, specifically in regard to how the hem band is attached. you are supposed to sew one side of the band to the right side of the hem, then fold the inner SA of the hem band and stitch all the way around to catch the underside. now, i don’t know about you, but that just sounds like it would be a hot mess on the inside. it can be challenging enough to catch woven fabrics that way, but a knit? i don’t think so! plus, the hem is one of the few areas that needs to retain stretch, so doing this on my straight stitch seemed like a bad idea. i decided to cut the tie part of the hem band off and attach it separately. i’m not super happy with how that came out, and weeks later a much better way of doing the whole hem band and ties dawned on me. i’ll show you what i’m talking about later because i made wrap tops for my two ballet-dancing girls and took a few pics.

IMG_2080

all in all i have mixed feelings about this pattern. on the one hand the fit is odd and the construction isn’t awesome… but then again, it’s all highly fixable for future makes. the only reason i don’t want to jump ship and try a different pattern is because of the raglan sleeve. i LOVE raglan sleeves. they eliminate all my shoulder adjustments and who doesn’t love to “set in” a sleeve by sewing two nearly straight lines? winning!

IMG_2094

okay, that’s all for now. i have so many projects to share, and so little time to do it, blah, blah, blah, yada, yada, yada… same song and dance as everyone this time of year. hopefully i can get caught up before 2014 rolls in! hey, don’t laugh. it could happen…

—lisa g.