Denim Shirtdress | New Look 6487

I don’t browse the New Look selection very often, partially because I don’t like the website (though it is improved from the original re-design) and partially because they never go on sale like the Simplicity/McCalls $1-ish sales at JoAnn’s. In all fairness, the standard $5 price tag is super reasonable, so I should really peruse their selection more frequently. As a bonus—I never need to wait for a sale.

img_3183

The “tween” pattern New Look 6487 stopped me dead in my tracks, so I made sure to pick it up. It’s so cute! I love all the style options included. I’m sure it’ll be on repeat all year round—currently all three of my girls are asking for one version or another. Being the youngest girl, Isabella always gets the ratty hand-me-downs (poor thing!) so I try to make her something special every now and again. She happened to be with me when I bought the pattern and she loved this lightweight denim at JoAnn’s—perfect match. And seriously, this fabric is so nice and soft! I’m sure I’ll be going back for more.

img_3198

The smallest size is an 8, and she is very tiny as is (just shy of 9 yrs old), so I knew it would be big on her. I did not make any size alterations to the pattern because I figured it would be fine to be oversized now, and hopefully fit her better next year. I did eliminate the back pleat because I felt it was odd to have the pleat combined with the gathered skirt. Idk, maybe I’m just being weird, but I didn’t like it. Since there is plenty of volume as is, I simply shifted the back piece off the edge of the fabric, and did the same with the back skirt piece.

img_3196

The only other change I made was to cut different chest pockets. The pattern has a funky pocket shape and I wasn’t digging it. I keep pocket templates sitting around in my sewing room, so I just grabbed a kid sized pocket and used that.

img_3184

I just want to note how pleased I was with this pattern! The yoke, collar, and collar stand all have full size pieces, with the grain line correctly indicated. Frequently these pieces are cut on the fold and laid perpendicular to the grain, where they should be turned and cut with the grain. At least this is how it’s done in RTW, and also how David Coffin illustrates it to be done in his Shirtmaking book. Additionally, the neckline and collar pieces have 3/8″ SA’s, making it infinitely easier to assemble. I always cut down the SA’s if they are any wider than this, so it was nice that I didn’t have to fuss with changing it myself.

img_3187

Oversized or not, she is completely in love with this dress and has snuck in several wears before throwing it in the wash. It’s denim, so who am I to judge. She plans to layer it with leggings or tights and a long sleeve tee underneath so she can continue to wear it through the winter since you can’t easily stuff the sleeves into a sweater. All in all I am super pleased with how this dress came out, as is Isabella. I’ll definitely be sewing this one again, and *ahem* maybe making a knockoff for myself…

—lisa g.


TL;DR

PATTERN: New Look 6487
FABRIC: lightweight denim | JoAnn’s
SIZE: 8 (measurements for reference: 4’2″/22.5″/21.5″/24″)
MODS: eliminated back pleat, used different chest pocket
ALTERATIONS: none
NEXT TIME: no changes planned

Skater Dress | McCalls 7079

I recently picked up McCalls 7079 to make my oldest daughter (12 yrs) a casual dress. I love that this pattern has several different style options, from plain to a little more girly. This will be a very versatile pattern to have around!

IMG_2504

I let her pick out the combination she wanted, and she opted for short sleeves and a flared skirt. I was going to do the triangle back cutout, but decided to go with the plain back to check the fit first. Without the cutout she can easily pair this with leggings and cardigans for Fall.

The fabric I used is from Cali Fabrics. It’s a cotton/lycra and is perfect for this style. This was the first time I ordered from them, and I was pleased with the quick shipping and overall quality of the fabrics; I’ll definitely order from them in the future since they have such a large selection of knits. My only quibble with this fabric is that the black ink bled in places onto the white. I usually use a color catcher when washing fabrics like this, but I totally spaced. Overall, it’s not really noticeable, but something to note if you have this one in your stash.

IMG_2509

She generally wears a 12/14 in girls sizes, but her measurements put her all over the place for this pattern. I decided to sew a straight size 12 since I didn’t need to be overly fussed about fitting. This seems to have worked out just fine—it fits well through the shoulders, and still has some ease through the waist. Now, she’s not really into letting me closely examine her to check the more fine points of fitting (and this print is really busy, obscuring any fit issues from the casual observer) but I think she could use a little extra length in the bodice front.

IMG_2505

The sleeves have quite a bit of extra ease in the sleeve cap—more so than a knit tee requires—so I lowered the cap by about 3/8″ to remove some of it. Also, the sleeves have a 1″ hem allowance, which seems unusually deep, so I cut off 1/2″ and did my preferred 1/2″ hem.

The only other change I made was to the neckline. The instructions suggest that you double turn the neckline and top stitch in place (a 5/8″ hem allowance). I just really, really hate that type of finish, and looking at the few examples I found online, the neckline looks too wide to me. Changing nothing to the pattern, I simply added a 1/2″ neckband, sewn with a 1/4″ SA. With the neckband it looks more like a regular t-shirt neckline, and that’s really what we wanted anyway.

IMG_2503

Sleeve cap and neckline preferences aside, this is a great pattern, and I’m sure I’ll be using it frequently. My girls love this style of dress, and it’s so fast to sew up. Most importantly, she immediately declared it her “favorite dress ever!” so. That’s a win.

—lisa g.


TL;DR

PATTERN: McCalls 7079
FABRIC: cotton/lycra from califabrics.com (available here)
SIZE: 12 (measurements for reference: 5’0″/32″/24.5″/31.5″)
MODS: added neckband
ALTERATIONS: lowered sleeve cap
NEXT TIME: add length to front bodice

plaid wool coat

A couple years ago my husband’s aunt sent me a box of fabric, which included several cuts of Pendleton wool in various weights. No idea where it all came from originally, but there were receipts mixed in with the fabric dated from 1992. (So does 20+ years make it vintage? Egads!) Most of the fabrics coordinate in a pink and teal color scheme—not so much my style, but it occurred to me that this plaid fabric would look great on my 10 year old daughter, Sylvia.

IMG_1238

Since the fabric is crazy bold, I wanted to pair it with a classic tailored style. I used Burda 8/2013 #143, which I’ve had on my favorites list for ages. It is quite a bit of work prepping a Burda coat pattern, but the lack of included seam allowances allows me to add SA widths of my choosing, which I actually love. I followed the RTW Tailoring Sew-A-Long over on Pattern-Scissors-Cloth (instead of the Burda directions), which makes the whole process go so smoothly. Gawd if she released an eBook with all that great information, I would be first in line to buy it!

IMG_1205

I used Pro-Weft Supreme, Medium fusible from Fashion Sewing Supply for the interior structure. This interfacing was an absolute pleasure to work with. It’s very soft and easy to fuse; perfect for a coat. I also used fusible hair canvas for the collar stand and lapels. I lined the coat with a thin poly satin (leftover from another coat project) and then underlined the main body pieces in flannel for some additional warmth.

IMG_1225

Cutting out plaid coating is no joke people. It took me several hours, even though there were relatively few pieces. Each piece was cut individually in a single layer, and painstakingly matched. Despite being suuuuper careful, I managed to cut the back pieces about 1/4″ off from the front. Thankfully, I was able to shift and trim things ever so slightly to fix it. Sheesh, that was a close one!

IMG_1212

I really waffled about whether to cut the welts on the bias or to match them across the front. I cut some scraps of fabric for comparison, and ended up nixing the bias cut. The plaid is so large that it was hard to find a spot where the bias cut looked good. Before diving into the welt pocket construction, I took a practice run on scraps. The coating fabric isn’t super thick, but thick enough to create a challenge getting everything to lay flat. Basting the welts shut and giving it a good press with steam followed by a clapper did the trick.

IMG_1141

Since this is a proper tailored coat, I made sure to add shoulder pads (teeny tiny ones that I made!) and sleeve heads. The shoulder pad is just one layer of thick fleece covered in muslin, and the sleeve head is cut from a scrap of flannel. You can kind of see all the inner structure in this photo where I’m attaching the lining to the facing.

IMG_1208

I decided to make fabric covered buttons for the coat because there was nothing in a store that was going to be just right. Remember how I said I had coordinating wool fabrics? That came in handy here! The pink wool that I used to cover the buttons is lighter weight (I made a blazer out of it a while back) and was just the thing for covered buttons. For the buttonholes, I used top stitching thread to give them a little more substance. My machine does’t have a keyhole feature, unfortunately, so these are just plain jane. I thought of doing them by hand, but these ended up looking good enough.

IMG_1231

For once I didn’t want to rely on top stitching to keep the lapels nice and crisp, so I made sure to under stitch the collar, lapel, and front edge. Then I basted the edges and gave it all a good solid pressing and steaming, and let it set over night. This step makes all the difference in the world on the finished product.

IMG_1241

I couldn’t be more pleased with the outcome on this coat! The pattern is great, the fabric is perfect, and my daughter loves it. Initially, I was worried that the fit was a little too perfect, but It looks like she has a good 1.5″ in sleeve length for growing room. In other words, she should be able to wear it next fall/winter as well.

lisa g.

Megan Nielsen | Mini Virginia Leggings and Briar Tee

When Megan Nielsen announced her line of “Mini” patterns for kids, I was super excited! I immediately signed up for testing, and tested the Mini Virginia Leggings. One thing I particularly love about the new patterns is the size range. Now that my oldest daughter is a, um, “tween”, she’s outsized of most kids patterns. These patterns make it up to a size 12, so they’ll cover all three of my girls for now. For testing, I made the larger size for my oldest daughter. I prefer to make a straight size (unaltered) for testing purposes, and really I made them a size too big and ended up taking them in significantly. In retrospect, my fabric was also a bit too stretchy, so unfortunately my test wasn’t the most accurate representation of the pattern. Regardless, she wears them all the time even if the fit is a little off.

IMG_0770

I still wanted to give the pattern another shot, so the other day I made up a pair for my youngest daughter, Isabella, who is 8. She’s itty bitty for her age, so I always run into the problem of her clothes being way too wide, or way too short. Also, being the third girl in line, her clothes are practically in rags by the time they make it to her closet! Basically, the leggings situation for her was dire. Her waist puts her in a size 4/5, but her height is in the 6/7 range. To accommodate, I traced off a 4/5, but added length to the rise and legs to correspond to the 6/7.

IMG_0790

This sizing alteration worked out perfectly, and she is so very happy with them! The fabric I used is a nice thick cotton spandex that was leftover from an older project. Since my machines were all out and threaded, I quickly made her a second pair in grey, also from leftover fabric. I suspect more requests for leggings will be rolling in, as daughter no. 2 was giving me serious side eye for making Izzie not just one, but two new pairs of leggings.

IMG_0794

Oh, and let’s not forget this tee… more scrap busting here! I found a large-ish scrap of this fabric in one of my bins, and I was able to just squeeze out a Briar Tee. Bonus points that it matches both pairs of leggings! I was on limited fabric yardage here, so I went with the longer variation, but cut it shorter by a size (6/7, cut to a 4/5 in length). I think this worked out really well, and she is absolutely in love with it. My girls really love the longer back hemline, so… more requests have been made. Isabella wore this outfit to school the very next day and bragged on it to her friends who were totes impressed that I made a tee shirt and two pairs of leggings in one afternoon.

IMG_0786

So far, these patterns are huge winners in this household. I love them, my kids love them… there will be many repeats!

Mini Tania Culottes | Mini Briar Sweater and Tee | Mini Virginia Leggings | Mini Wardrobe Pack

lisa g.

Disclosure: I was a tester for the Mini Virginia Leggings, and received the whole trio of finished patterns gratis. No blogging required, but hello! They’re adorable and I would have shared anyway.

McCalls 6948

Making tiny dresses for my girls has a way of becoming very addictive. Not many fit issues to worry about, small yardage, and quick to make. I bought this blue rose fabric last fall-ish, rescued from the clearance table at Joanns. It’s one of those rare sightings of rayon challis—wish they’d stock more of this instead of all the nasty poly prints they have in so much abundance. I really planned to use this fabric for myself, but the scale of the print seemed either too big or too small… just right for a pint size dress though. 🙂

I took these photos just over a week ago… that white stuff was our last little pile of snow!

IMG_9569

McCalls 6948 was just the ticket. Seriously cute pattern if you have girls to sew for! It’s kind of like a mini Sewaholic Saltspring, complete with several variations. My girls are all asking me for maxi skirts or dresses, so I decided to make the variation that has a faux-wrap skirt. It’s nice and long in the back, but shorter in the front so it’s runaround friendly. I’m always worried about them tripping in longer skirts otherwise. (True confession… I totally spaced on cutting the front skirt pieces on the correct grain. The CF should be on the straight of grain, but I lined up the side seam on the straight by mistake. Oops!)

IMG_9558

I fully lined the dress instead of doing a bias facing on the neckline and sleeves. The fabric probably would have been okay without a lining, but it was just right on the line for opacity. To line the skirt, I omitted the wrap and simply marked 2″ above where the front panels overlap, and cut it on the fold. I kept the back skirt lining short as well, since there was no need to make the lining as long as the dress.

IMG_9564

For sizing, I cut a 4, then slashed and lengthened to the size 6, and cut a straight size 6 skirt. The neckline is borderline too low for what I’d expect in a kid’s pattern, so that’s something to watch out for. Overall, it came out a little bigger than I was anticipating, but it should fit her for quite a while.

IMG_9573

This pattern gets a huge thumbs up from me, and an even bigger thumbs up from my girl. I think she’s worn it three times already, and is always swan-ing around and letting the skirt flap around dramatically. I’m sure I’ll be using this pattern many more times!

—lisa g.

Easter dress no. 3 | Simplicity 1510

Finally, here is the last Easter dress for this year. My oldest daughter, Anastasia, the only one who actually required a new dress, turns up her nose at anything too girly. She does like dresses and skirts, she just insists that they not be too poofy. We flipped through patterns together, and Simplicity 1510 really caught her eye.

IMG_9397

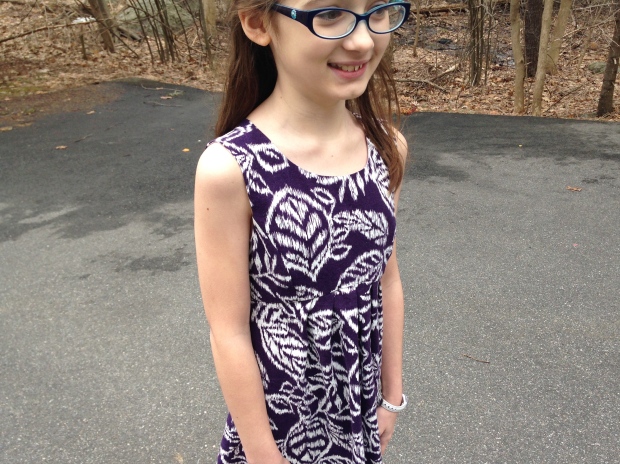
Purple has always been her favorite color, so when I saw this linen Ikat leaf print at Joanns, I knew she would approve. Like my other girls, she is narrower than she is tall on the sizing chart. She measured about an 8 in width, and 10 in height. I slashed the bodice horizontally and added 1/2″ in length. I kept the armhole depth at the size 8, as she’s built somewhat like me—more petite in the upper body, but longer from the waist down. For the skirt, I simply extended the length down to the size 10.

IMG_9420

This is a cute little pattern, and I love the pleating at the waistline. The bodice hits close to the natural waist in the back, but curves up to a more empire shape in the front. I know it’s difficult to see the details because of the print, so check out the line drawing so you can see the style better.

IMG_9424

The pattern came together very quickly and easily, however, there is an error in the line drawing. It shows that the princess seams should line up with the pleats, but they do not. It does line up with the pleated edge on the inside of the dress, so just be aware of that if you’re looking to make this pattern. Other than that little glitch, I’m very pleased with the pattern! I find that in the McCalls and Simplicity kids patterns, you have to pay close attention to the body measurements (waist, chest, and height!) and ignore the size number. I feel kind of crazy for making a size 8 for my nearly 11-yr old, average-sized daughter, but there you have it. It fits well and she’s sure to wear it often.

IMG_9374

Whew, all that dress sewing just makes me want to sew more dresses… it’s so addictive! Now it’d be great if we could conjure up some Spring weather. The last few patches of snow are just now melting!

—lisa g.

Easter dress no. 2 | New Look 6118

Even though I had bought a couple potential Easter dress fabrics, none of them were really inspiring me for kid dresses. In desperation, I hit up Joanns and remembered their (surprisingly good) linen selection. Isabella is a tiny 7-yr old, and she wanted fabric that “wasn’t too pink.” She prefers yellow and blue, and she’s loudly intolerant of anything that doesn’t meet her expectations. Fortunately, she approved of my fabric choice!

IMG_9357

I choose New Look 6118 because I like the high neckline of the front paired with the dramatic scoop of the back. Also, this bodice had no darts or shaping, which is perfect for my very straight-torso’d daughter. I had wanted to do a gathered skirt, but she insisted on twirly, like her sister’s dress. Can’t blame her for that!

IMG_9329

This girl is absolutely tiny. She’s always under the 10th percentile for weight, and 20th for height. This makes both buying and sewing clothes for her a real challenge. I only recently pulled the last of the 4T sizes from her closet, mostly on principal and the fact that her closet is stuffed with hand-me-downs, not because they no longer fit. On the NL size chart, she measured about a 4 in width, but a 6 in height. To make it work, I cut out a 4 and then lengthened the bodice pieces. Even at that, the dress is plenty roomy, but it should fit through the whole spring and summer.

IMG_9349

I ditched the back buttons and inserted an invisible zip instead. The fabric print is busy enough, I didn’t need buttons for any special effect. For the 3/4 circle skirt I was able to use the same draft from her sister’s dress, just slightly adjusted to fit this bodice.

IMG_9363

The hem is finished with bias tape. It both gives the hemline structure, and makes it super easy to hem. Plus, it was a way to sneak in the yellow she wanted.

IMG_9360

This dress is getting high marks from the girl, and I’m super happy with it as well! As tempting as it was to skip the pattern alterations, it just wouldn’t have fit otherwise. I mean, yeah, that’s a pretty obvious statement, but I guess I’m lazy when it comes to sewing for the kids!

—lisa g.

Easter dresses no. 1 | Burda 07/2014 #136

I decided to make Easter dresses for my girls this year. I have to say, it is pretty nice having three girls to sew up pretty dresses for… keeps me from making myself a bunch of dresses I don’t need. I had a hard time finding good springtime cottons, despite searching my local haunts. It seems these fabrics don’t always show up in stores early enough for me to plan for Easter sewing. I could have ordered online, but eh. Shipping costs are such a buzzkill. I ended up buying a high quality ponte from Fabric Basement. This print was perfect for daughter number 2, Sylvia. She immediately fell for this fabric, and demanded it be hers. Okay, child, yours it shall be.

IMG_9317

I wanted to make her something more special than the typical skater dress, so I decided to try Burda 07/2014 #136. I love how the princess seams go straight into the straps, which have a slight cap sleeve. I ditched the sweetheart neckline and adjusted it to be straight-ish (it actually has a slight curve).

IMG_9322

The pattern calls for a woven, so I sized down in the bodice, but added length so it would hit her waist correctly. The ponte has great drape, but it gets bulky very quickly. For this reason I skipped lining the bodice, and instead drafted an all-in-one facing. I feel pretty clever for drafting out the bodice seaming and maneuvering the square neckline as neatly as I managed. *pats self on back*

IMG_9324

I drafted a 3/4 circle skirt because she likes twirly, and a gathered skirt would be far too bulky and heavy. I measured the skirt length of a dress in her closet and drafted accordingly, but we had not yet gone to her annual doctors appointment where I found out that she grew 3″ in the past year (whut?!) so… oops.

To preserve all the length I did a simple 3-thread (no stitch finger) serged finish on the edge. I think this ended up being a good thing because the ponte probably wouldn’t have hemmed nicely with such a rounded hem anyways.

IMG_9311

Even though this is a knit dress, I did all the construction on my sewing machine. The fabric is really too thick for the serger, plus I wouldn’t have had the control and precision needed to navigate the neckline. I also kept the invisible side zip to make sure the waistline didn’t get strained and risk popping stitches.

I am so happy with how this dress came out! It’s feminine while still giving her the comfort to move around and not feel restricted. FYI, Burda also has a women’s version of this pattern—um, yes, please!

IMG_9318

—lisa g.

calli faye | wednesday dress

here is the calli faye wednesday dress made up as intended. since i was bummed about not having enough fabric to make this dress for my daughter’s birthday, i picked up more fabric right after finishing her blouse version. this is a cotton batik with a fine weave and soft hand. perfect for summer dresses!

IMG_3674

as i mentioned before, i was a little thrown by the sizing chart because it put my 50th percentile 10 yr old in a size 6. i ended up tracing the size 7 width, but extending the side seam all the way out to a size 10 length. then i used the bodice length of the size 8 to mark the waistband casing. i probably could have gone with the 8 in length as well, but i really like the modest hemline. in a sea of super short kid dress and skirt options, it’s kind of nice to have something a little more covered.

IMG_3682

plus it nicely balances the generous cutout on the back. i used the size 7 cutout, but i would probably reshape it a little smaller next time. it’s very open, and i’m not sure i’d send her to school in it. however it’s great for the casual summer dress it is. the only thing i altered other than sizing was to lower the neckline by 1″.

IMG_3688

sneaky appearance of oliver in a pair of unblogged pants…

this pattern has you partially line the dress. there aren’t separate pattern pieces for the skirt portion, so the liner is  just on the bodice and it very neatly finishes all the openings and creates the casing for the drawstring. since i had some metal eyelets on hand in exactly the right color (they came with my snap/eyelet tool) i used those instead of making buttonholes. the drawstring is simply self-bias tape made into spaghetti straps. then i attached the straps to a 10″ piece of 1/4″ elastic, which ends up at the back of the dress. that way the bow can be tied with a pretty drawstring, but the waist still stretches in the back. i hope that makes sense! basically, the middle third of the drawstring is elastic, while the ends are made from the bias tape.

IMG_3677

final thoughts:

i think this is a really nice pattern. i appreciate the simple shape to showcase great fabrics, plus it’s perfectly casual for everyday wear.  it is quick to sew up and, in this size, took less than two yards of a rather narrow fabric. the pdf itself felt a little clunky to put together. there was a lot of paper waste where a pattern piece just crossed over to a new page. part of this is because instead of tiling the entire pattern, certain pages are used for each pattern piece. i see this in a lot of the kid pdf patterns, and sometimes it works out great. it’s just that here (probably because i was using the larger end of the size spectrum) it felt like i wasted a several sheets of paper.

the armholes with the lining were a little tricky to navigate. i had to sew the arm opening, starting and stoping exactly where the side seam starts. then, i folded the armhole opening out of the way to sew the lining and outer side seams. i couldn’t do it in one continuous seam without major puckering under the arm, so i sewed the lining side seam, then stopped, repositioned, and sewed the shell side seam… not a big deal, but this could have been handled better in the directions. lastly, i may have mis-measured, but double check the opening placement for the drawstring before making holes. the spot i had marked would have been too low… again, that could have been my error!

all in all i’m pleased with how this came out. i’m happy i made the sizing choices i did (following the measurements, not RTW size) otherwise there would have been tons of excess fabric in the bodice. and naturally, her sisters are begging for their own. this pattern comes in 12mo-girls size 10 US, so it’s a great buy.

IMG_3695

all my monkeys bid you a happy summer!

—lisa g.

ten

today is the last day of school for the kiddos. the last month of school is such a crazy time filled with activities and shows and events at school. not to mention the fact that the hubbs and i road-tripped it down to NYC last thurs/friday (more on that later!!). it’s always a relief to be on the other side, but of course that means they will all be home alllll day… it always takes a while to adjust, and no doubt they’ll be at each other’s throats in no time.

photo 2

so the “ten” alluded to in the title refers to my oldest daughter who just turned the big one-oh. ack! double digits! i always try to make the kids something for their birthday, so i picked up a rayon challis in a fabric that is totally her. i started with the cali faye collection wednesday dress, but i utterly underestimated the fabric needed. to compensate, i cut the pattern down to a blouse length and narrowed the sides to fit the fabric. there is still plenty of swing, and it worked out perfectly.

IMG_3317

certainly doesn’t look like much on the hangar

i skipped the cutout on the back since the fabric has so much drape, and instead left a long opening closed with a button in the back. then, i shaped the hem with a slight high/low thing happening.

IMG_3316

she wore it to school on her birthday and when i asked what her friends thought, she told me (exasperatedly) the class practically lined up to tell me they loved my shirt. even my teacher! she’s not one who is comfortable with a lot of attention, but it totally made my day. 🙂

IMG_3338

as far as sizing goes, based on her measurements, she sits at about a size 6 in width, but almost 10 in height. i find this utterly frustrating in kids clothing—RTW or patterns. i decided on a size 7, and would have lengthened to a 10 but… like i said, i didn’t have enough for the dress anyways. i was so bummed about that i went and bought a different fabric, which i successfully cut, and i can’t wait to sew it up so i can give a better review!

lisa g.