denim dress

a while back i got the idea in my head that i needed a denim dress. it seemed like a nice casual and potentially versatile garment to have in my wardrobe, so i picked up some denim at sewfisticated. these people always have a table of $2.99/yd denim remnants and i check out that table almost every time i visit. this one is probably around a 6.5 oz denim—lightweight, but still substantial.

IMG_1909

i planned to revisit mccalls 5927, which i made last year in plaid. my intent with making that dress was to fit a bodice i could go back to as a TNT. upon re-trying on that dress the multiple fit issues were very apparent—shoulder seam needed to move out, the back neck needs darts or re-shaping, etc. i had a pretty long list of changes i didn’t feel like dealing with. instead i went back to the hawthorn bodice, which i had fit recently, and fit well. i redrafted bits to eliminate the front button closure, added a back seam for a zipper, and replaced the v-neck with a scooped neckline.

IMG_1885

then i wanted to have some cap sleeves so it would easily fit under a cardigan or sweater. the sleeves proved quite an ordeal. i went back to the cap sleeve on the mccalls pattern and tried those, but they ended up a little too “strong shouldered” for my tastes. i mulled over it, then just fidgeted with them until i liked what i saw. so i cut off most of the cap with the pleating and just set it in with incidental gathers. obviously, it’s not perfect and there is either too much or too little ease in the cap, but it really doesn’t bother me. overall, the shape is very nice and i’m quite happy with it!

for the skirt, i pulled out NL 6776 (used perviously here and here) because it has a nice a-line shape and doesn’t take up a crap-ton of fabric. i pleated it to my heart’s content… which. took. forever. to get right. love pleats, but geeze they can be annoying. as you can see, i added a little swoop front pocket. inseam pockets are great, but i’m always annoyed about how the pocket bags flop about. i went back to the mccalls pattern as a guide and went from there.

since this is a denim dress, i took the opportunity to topstitch in white. i considered the more traditional gold, but i also like the look of white on denim. i even used white when stitching the zip down the back, and i did a pretty good job of keeping it straight! while i intended to wear a belt with this dress, the topstitching at the waist gives just enough definition that i don’t feel super inclined to bother with one.

IMG_1870

i had anticipated finding loads of things in my closet to layer with this dress, but came up pretty much empty-handed. that’s the problem with an at-waist dress: all my sweaters hit at my high hip, which looks terrible! then i grabbed this cardigan i made a year and a half ago (jalie 2919, unblogged but much loved! p.s. i nixed the ridiculous stitched pleats for gathers at the shoulder). it’s very very long, so i frequently just tie it around my waist. it works okay, but now i think i need a few papercut coppelia  wraps in my closet to pair with this dress for the colder months.

i hope you followed my merry adventures through all those patterns to get to this dress… i thought it was apropos to publish a real frankenpattern mash up on halloween, so happy halloween all!

—lisa g.

moss mini, in denim

as soon as i made my first grainline studio moss mini i knew i would be making another. it so happened that when i made my denim thurlows earlier this year i used my ninja layout and cutting skillzzzzzz and had quite a bit of denim left over. just enough for a skirt! oh yes, i’m that good. so i wanted to go full on denim skirt here and go crazy with the topstitching and pockets and belt loops. the whole deal.

IMG_0486

first thing i had to do was modify the front pocket situation. both the thurlow pattern and the moss mini have the “pocket gape” feature where the pocket stands out just a bit from the body. due to the position of the pocket opening (a slant as opposed to a more vertical slash opening) the gape makes it so the pocket is useable. in order to get a classic jeans pocket shape i had to eliminate the gape, then draft a rounded opening. i even added a coin pocket.

IMG_0412

one feature of this pattern is that the pocket bags extend into the fly construction. it gives them great stability and helps everything lay nicely. however, it does create some bulk around the fly facing and attaching the zip to the underlap, so i may modify this if i make the skirt again (which i most likely will). also, the fly construction method was completely different than any other method i’ve seen. you sew up the entire overlap side and topstitch it before sewing any of the underlap. admittedly, i have mixed feelings on this… due to the pocket pieces also being sewn into this seam, and my heavy-ish denim, i lost a bit of SA to turn of cloth and i barely had enough room to sew the zip to the underlap side. i think it would be good to have a little extra SA on the underlap to make sure there is plenty of room. that said, i’m very intrigued by this method as it is completely new to me!

photo 1

i hammered in a heavy duty snap instead of using a button

i am totally pleased with the fit i achieved. based on my last make, i decided to go up a size in width on the back pieces, then shave about 1/2″ off the CB yoke at the waist tapering back out over le bootay. i also cut the waistband with 1/2″ less at CB to compensate. this worked out perfectly and, for a girl who has had to deal with gaping waistbands all her life, it is so thrilling to have complete coverage. no gape. i can sit on the floor with the kiddos and it still holds snugly over my rump. oh and i lengthened the skirt in place of doing the hem band.

IMG_0490

i went all out with top stitching. i am by no means a perfect top stitcher, so i cheated a little and used my blind hem foot adjusted to use as a guide for edge stitching, then a 1/4″ quilt piecing foot for the second row. seriously easier than driving yourself crazy doing it by eye. also, i would have loved to flat-fell my seams, but i figured i could only ask so much of my machine. the bulk would have just been too much, and i’m pretty content with serged and faux-felled SA’s.

photo 2

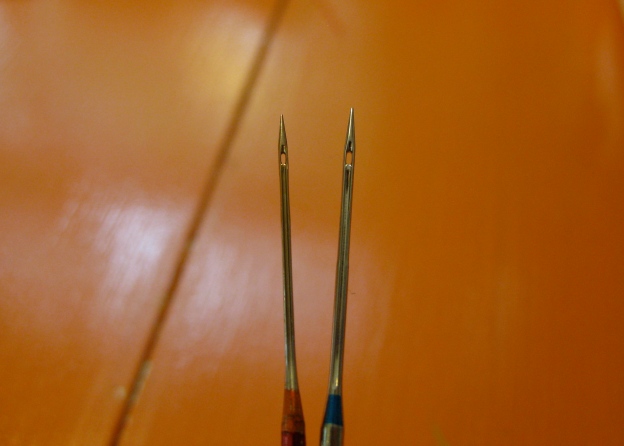
last thing: i use a fairly entry level babylock sewing machine, but no matter what machine you use, you can’t expect it to breeze through bulky denim seams without using a proper denim needle. i can’t stress this enough. i’ve used regular needles for heavier weight fabrics and end up with broken needles and top stitching that is all wonky. not only is a denim needle stronger, the eye is wider to accommodate thicker thread (hello top stitching!). also helpful: a hammer nearby to whack those bulky seams into submission before top stitching. makes a huge difference. plus, it’s just fun.

IMG_0402

regular needle on the left, denim needle on the right

well i’ve been sewing up a storm and will hopefully get back soon with a couple more things i’ve finished. then… well i need to sew up some kid stuff. i might even *gasp* refashion some of my older RTW that is out of rotation. wish me luck…

—lisa g.

p.s. my top is blogged HERE. 🙂

thurlow in denim

for months i’ve wanted to make some thurlow pants, and i finally got around to it! i went with a denim because i found some for a great price. basically (not including the pattern) these pants cost me less than $10. that’s a definite win in my book!


i measure a straight size 6, but when i used this pattern before i went with a size 4. there is still plenty of room for these to be comfortable, in fact i’ve already spent two full days wearing them. i love this type of pant because i can look nice without being dressed up.

it does feel weird cropping out my head
so i can properly show you my bum and
then posting it on the internet… but whatevs.


any changes i made are subtle. i changed the order of construction slightly, using the method i learned from the jalie jeans pattern. it allows you to construct the fly without having the back of the pants attached yet. once the fly is constructed, and the back pieces are sewn together, you sew front to back by sewing the entire inseam and then the side seams. i really like this for a few reasons. first, you can topstitch the crotch flat, you can topstitch the inseam, and you can adjust the legs as needed to get the fit you want.


my denim is a little heavy and bulky so i needed my seam allowances to be controlled as much as possible, hence all the topstitching. i was concerned that my topstitching would detract from the look, but you can barely see it because my fabric is so dark. fine by me!

i decided to go with a single inset welt for the back pockets. i felt the double welts were a little oversized and perhaps a touch low. i made the single welt where the top of the double welt would be, if that makes any sense. i used poppykettle’s fab tutorial to make my pockets and they turned out perfect. i also added a button hole just as extra insurance against unsightly back pocket gaping.


as i mentioned in my last post, i adjusted the fly extension piece so that my waistband would line up correctly and everything would be in it’s proper place. i ended up trimming off the extra seam allowance in the back. as i said before, my denim is fairly heavy and it was just creating unnecessary bulk. i fit a straight size 4 so i think in the future i’ll just trim the excess out to begin with.

hammered in a shank button. p.s. the dritz jeans buttons suck
big time. gonna have to find a different brand, these are
nearly impossible to get in!


i added 1″ in length and they are just a touch long for wearing flats, but i figure they’ll shrink up as they get washed. i can always adjust the length later as needed.

as i’ve said before, this is a GREAT pattern. other than tweaking maybe the front crotch depth, i really have a good fit. hopefully i can get around to making another pair (or two or three or ten) because i could really use more pants!


okay, if you don’t hear from me for a while it’s because i’ve been buried in snow. we have 18-30″ (45-76 cm for you metric types) of the stuff coming our way tomorrow through saturday. blizzard! so, i’m off to stock the pantry…

—lisa g.