fancy dress time

so here is an exciting project i have to get working on very soon! my husband and i have been invited to a charity dinner in NYC (on his company’s dime) that takes place in just a few weeks. it’s a “black tie optional” type deal at the Grand Hyatt. and ya’ll know what that means…

I’M MAKING A FANCY DRESS

i’ve put all of my usual practical sewing oh hold (except for one summer dress i’m finishing up). i really do love the practical sewing i usually do, but i’ll gladly shelve it all for something more exciting! i agonized for a few days as to what kind of dress i should make—silk bias cut? over the top chiffon gathers? short? floor-length? too many options! i had a few silhouettes in mind when i headed out to the fabric store the other day and decided to go with something structured. then last night i browsed mccalls patterns and this grabbed me immediately:

gorgeous! it will work perfectly with my fabrics and should keep me plenty comfortable. plus fitting shouldn’t be too much of a hassle (famous last words…).

so here are the fabrics i’ve chosen…

IMG_3217

this is a poly/rayon burnout that will overlay a navy cotton sateen. then the dress will be fully lined in navy bemberg. since my overlay fabric has a nice sheen to it i nixed the idea of splurging on silks or compromising with poly satin. when confronted with $8/yd vs. $40/yd… well ya’ll know me too well. plus i could buy extra fabric for insurance without breaking the bank.

here you can see the burnout pattern

here you can see the burnout pattern

i’ll be doing the full skirt, and as for bodice… perhaps both. i haven’t pulled out the pattern pieces yet, but i think i’ll make the strap-y bodice from the sateen, then overlay the top portion with my burnout using the v-neck fuller coverage pattern pieces (minus any of the lace trim). i’ll have to sort out how that’ll work, but i think the idea has promise.

i already bought some sparkly new shoes, the only missing piece is a clutch of some sort… that’ll probably be a last minute detail.

guys, i am totes excited for our trip because… i’ll have plenty of time to work in some NYC fabric shopping! it’s kinda sad that we only live 3 hours away, and yet this will be my first real visit. of course i’ll visit the venerable mood fabrics, but what other shops should be on my must visit list? do tell!

—lisa g.

lane raglan v.3

spring weather around these parts is a bit of a mixed bag. eighty-five one day, 50ºF the next. i made this light sweatshirt-type shirt for those days when i need a warmer layer, but still want to look like spring. again, this is the lane raglan by hey june (clearly, i endorse this pattern!), and the fabric is a cotton interlock from girl charlee. this fabric is crazy soft and comfy, i love it so much!

IMG_2934

i was a little over confident in how much i could fit onto one yard of fabric and nearly didn’t get to make this top! i had to abandon print matching the sleeves to the main body pieces, and i was still short about 1″ in width. i briefly threw in the towel, then got it back out to try again. i arranged it so that only a small part at the underarm of one sleeve was hanging off the fabric. i cut it out, then went back and pieced a scrap on and finished cutting the sleeve.

i always win at fabric cutting.

i used rib knit from joann fabrics as the neck and sleeve/hem bands since interlock doesn’t have the recovery needed for the job. plus the ribbing gives it a more “authentic” sweatshirt vibe. i probably could have stretched the neck band tighter since it’s slightly wavy, but it doesn’t particularly bother me.

IMG_2950

for this version i shortened the hemline by 2″. it works a little better for layering with the shorter length, and, as it turns out, i wouldn’t have had enough fabric anyways. in case you were wondering, these are my jalie jeans that i made a few months ago. i honestly didn’t anticipate them becoming my go to jeans, but they are! my GAP jeans just feel so wrong now, i never reach for them. it’s definitely time for a second pair, but i suspect that won’t happen until fall. or sooner… who knows!

—lisa g.

knit shift dress | renfrew meets mccalls 6559 meets laurel

if me made may teaches me anything, it’s that my sewing is seriously out of sync with my blogging. and instagram is just an enabler since my makes are almost always seen there first. but, i have a several project backlog of photographed makes, so there does stand the chance that i’ll actually get them on ye olde blog soon-ish.

IMG_3022

a couple weeks ago i had a rare evening out with a group of moms from my daughter’s kindergarten class. naturally i needed to make something new for the occasion… you know how it is. but i should back up… i’ve been itching to add some flowy knit maxi skirts to my wardrobe, and i had a 2 yard piece of black cotton/lycra and thought that would be perfect. i drafted out a 1/4 circle skirt, but alas i was about 1/2 a yard short. i decided to try anyways and make an a-line maxi. chalked it out on my fabric, cut it out, sewed up the side seams and… well it was okay, but it just didn’t totally feel right. it was too fitted from waist to hip and would probably end up not worn very often.

awkward arm pose...

awkward arm pose…

i was bummed, but then i remembered the dinner outing and thought maybe i could get a shift dress even if i had to piece it together. well turns out that a failed maxi skirt is the exact amount of fabric required for a shift dress—no piecing necessary! i cut sleeves and binding from my remaining fabric (which i still had a good chunk of) and had a new dress hours later.

photo 1

so let’s talk about my pattern. you may recall last december that i made a shift dress for christmas out of a heavy sweater knit. i wore that dress a lot, so i knew i’d be making it again. i had hacked it by combining my sewaholic renfrew for the top with mccalls 6559 for the bottom. for this dress, i also narrowed the skirt hem, using my colette patterns laurel as a guide. (side note: why didn’t i just use my laurel—minus darts—for this dress? i had intended to, actually, but i pulled out my renfrew for comparison and i was afraid it would take some serious tweaking to get right. with my renfrew/shift previously hacked, the bulk of the work was already done.) basically all i did was line up the waist marking on the mccalls pattern with where my waist hits on the renfrew. line those two up and you’re ready to go! okay, mostly.

photo 2

one thing that has bugged me on my chevron dress is some excess fabric in the back, and little bit of pulling on the front causing the back to look like it’s sagging. to fix all that, i retraced, narrowing the back piece in quite a bit at the waist. then to address the pulling at the front i added in some bust room by slashing at the bust line and adding 3/8″. this excess i simply eased in when i sewed the side seams, keeping the excess concentrated from the armhole to just under the bust. i would tell you that adding in the extra room was my brilliant idea, but that’s how the mccalls pattern is drafted so i figured it was legit. just note that if you have a striped fabric, start your stripe matching under the bust, not at the armhole!

IMG_3043

i finished the neckline with a binding facing, rather than a neck band for a nice clean look. i serged a strip of fabric to the front, then turned it to the inside and top stitched with my cover hem. oh yeah… i bought a cover hem (!!!). we’re just getting acquainted, so i’ll hopefully post more on that later!

IMG_3040

and that’s about it! i can see this dress covering all the bases from a casual day dress to an accessorized date night dress for almost any season. versatility at it’s finest!

—lisa g.

julia cardigan | mouse house creations

if you’ve been following my me-made-may posts over on instagram, you’ve probably noticed a frequently worn cardigan of mine. i was needing a good spring weight cardigan—one that could keep the chill off my neck, but not overheat me—so i decided to try the julia cardigan by mouse house creations. it has a shaped, doubled up band encircling the entire neckline and hem, giving it a slight cocoon shape. best thing—no hemming required! sweater knits can be tricksy to hem, so that is a definite bonus.

IMG_2882

i really wish you could see the details better, but ya’ll know it’s hard to capture dark fabrics!

i used a not quite medium weight sweater knit from girl charlee, and it s just perfect for this. the double layered neck/hem band provides a cozy feel, but the slightly open shape keeps it from being too heavy.

IMG_2901


pattern notes:

this pattern is definitely a fabric hog. it used every bit of my 2 yards of fabric. it is rare that i throw all the scraps out after cutting, but i really did have nothing left! as i mentioned, the whole neckline/hem is one giant doubled up circle, and i had to piece one section to make it all work. not a big deal, but if you are working with a stripe or patterned fabric you’d be smart to buy extra! now, this pattern does have the option to cut the circle out of only one layer of fabric, but then you would be stuck hemming that giant edge, and i just don’t think it would look as polished. i wouldn’t even consider making it that way, personally.

IMG_2888

the sleeves are crazy wide at the bottom. somewhere in the pages and pages of directions it mentions the bell-ish sleeve, but i didn’t think it would be as huge as it is! i could easily take out two inches, and probably will at some point. i am a sleeve pusher upper, and these are way too loose to stay up.

IMG_2903

the sizing seems pretty spot on, and overall i’m very pleased with this pattern. i mean, i wear it practically every day, so there ya have it. it has served exactly the purpose i intended, and i love the unique shape. far more interesting that just a regular ol’ sweater.

IMG_2884

have a great weekend guys!

—lisa g.

a better gathered skirt

i like gathered skirts as much as anyone, but i tend to find the gathered rectangle variety a bit annoying. unless you are using a super thin fabric, they can get very bulky, very quickly. so, if you ever want a nice full gathered skirt with less waistline bulk, here’s how…

your typical full gathered skirt will have a hemline about twice that of your waist measurement. here i’m using a measurement of 30″

i’m drafting one quarter of the skirt, since most likely you will be cutting it on the fold.

step 1: divide your waist measurement by 4. this will be your quarter waist measurement

30/4=7.5

step 2: take your quarter waist measurement and multiply by 2

7.5×2=15

step 3: take your quarter waist measurement and multiply by 1.5

7.5×1.5=11.25

step 4: subtract the 1.5 measurement from the 2 times measurement

15-11.25=3.75

on your drafting or tracing paper, start by drawing a rectangle as wide as your 2 times measurement (15″) by however long you prefer. don’t bother with SA’s or hem allowances at this point.

with a straightedge, make about five evenly spaced vertical lines. cut along these lines, leaving a tiny bit connected at the bottom for a hinge.

overlap the slashed pieces until you have reduced the top measurement by the amount you figured in step 4 (3.75″–since i made 5 slashes, i will overlap about 0.75″ at each section). this doesn’t have to be absolutely precise, just keep it all as evenly distributed as possible, then tape the sections in place. since this piece is now a bit of a mess, trace the shape onto another piece of paper, rounding off the edges.

once you have retraced, add your side SA, waist SA, hem allowance, and fold markings at CF/CB. if your back piece needs a seam for a closure, just remember to add SA when cutting your fabric, or trace off another pattern piece with a CB SA.

once you have this drafted, you can add it to your favorite waistband and make a skirt or use it for the skirt portion of any dress.

photo 1

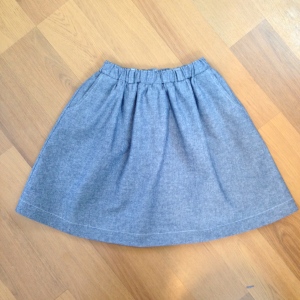
here i made a skirt for my daughter out of chambray. i added yoke front pockets, an elastic waist and belt loops. and sometimes i make my daughter clothes that i really wish i had made for myself…

–lisa g.

me-made-may ’14

me-made-may'14

i, lisa g. of notes from a mad housewife, sign up as a participant of Me-Made-May ’14. I endeavour to wear at least one handmade item each day for the duration of May 2014.

one of my sewing resolutions back from new years 2013 was to make an effort to sew things for daily wear. sometimes that’s t-shirts, jeans, skirts, silk blouses, casual dresses, sweatshirts… you get the idea. i have ample makes to choose from, and it’s rare that i reach for my RTW, aside from a few threadbare tees or my six year old yoga pants (ahem—i totally plan on making my own soon-ish). i chose to set the goal of wearing handmade every day because it’s less and less of a challenge for me. however, setting what is for many such a lofty goal, is not to make lesser or non-pledgers feel guilty or bad about their own wardrobes! MMM is about celebrating this crazy hobby we have in whatever way we can, whether it’s everyday or once a week, or just watching from the sidelines. we all have varied sewing goals and aspirations, and a nearly 100% handmade wardrobe just happens to be mine. yours is most likely different, and that’s okay!

documenting MMM will undoubtedly happen on instagram, and maybe a round-up or two on the blog (it would be helpful to know how to easily create an IG collage…).

here’s to a great me-made-may ’14!!!

—lisa g.