Many months ago, I was deep internet researching jeans-related construction, and came across a forum convo about flat-felled seams. I can’t remember exactly where this was posted (pattern review maybe?) but I tucked that info away in mah brain and pretty much forgot about it until now. I pulled out some denim for a pair of jean shorts and decided to do some testing on scraps. I was pretty excited about how my seams came out (as were you!) that I immediately tried another sample and snapped pics. Like I said, I didn’t come by this method independently, so if you’ve seen this discussed elsewhere, give me a holler so I can give credit where credit is due. [*UPDATE* Found it! It was a pattern review thread… I can’t seem to link directly to the convo, but it’s under “sewing techniques and tips>how to sew RTW style flat felled jeans seam.”]
There are two things that have always bothered me about the center back crotch seam on jeans (now there’s something only someone who sews might say…). First, the way things are usually constructed, the seam allowances are pressed to one side of the seam line. This means that the top stitching is not centered, and the pockets are not equidistant from the top stitching. You can space the back pockets differently on each side to offer a little more symmetry, but ultimately I would prefer a centered seam. The second thing that annoys me is that the original stitching line can end up looking a little bit strained. Even though the seam is perfectly secure from all the lines of stitching, sometimes you end up pulling on the original seam and you’ll see the lighter part of the denim showing through. Hard to explain that one, but if you’ve ever noticed this, you know what I’m getting at.

METHOD 1 | 3/8″ SA
I’m going to show two slightly different methods. The first method requires a 3/8″ SA, and is particularly useful on thicker fabrics because the final seam ends up with only 3 layers of fabric. (Click on the photos to enlarge)


Take the fabrics you will be joining, abut them, and sew a wide zig zag stitch to join them. Do not overlap the fabric. It doesn’t matter what thread you use, because this stitching will be hidden at the end.


This part gets difficult to explain, so bear with me and when in doubt, refer to the photos. Press the fabric just to one size of the zig zag stitching (about 3/16″ from the abutted edge), then turn to the other side and do the same. If you look at a cross section, your fabric will form a “Z”. The abutted seams are on the inside of the folds and completely covered.
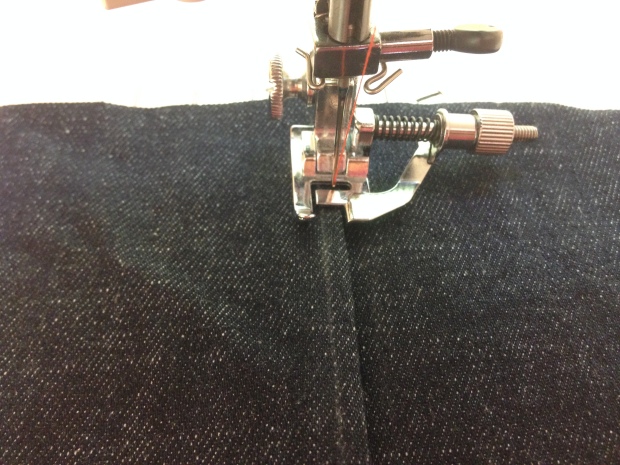


Top stitch from the right side, then make a second pass, which will just catch the folded edge on the wrong side. I like to use my blind hem foot as a guide, and I found that the folded ridge on the under side is lumpy enough that the foot can follow it for the second pass. This eliminates any guesswork or need to sew from the wrong side. Given that most machines have difficulty producing a nice stitch with top stitching thread in the bobbin, this is most useful!


At the begining I had marked the 3/8″ SA, and you can see that my marking is neatly centered. Also, you will note that the finished seam has three layers of fabric, making it perfect for thicker fabrics.
METHOD 2 | 1/2″ SA
The second method is essentially the same as the first, but it ends up being a little bulkier, and requires a 1/2″ SA.


Start by pressing one of the SA’s to the right side by 1/4″, and the other SA to the wrong side by 1/4″. Open it up, and overlap the pressed SA’s, using the pressed line as a guide.


Once overlapped, run a line of basting stitches down the center. Again, thread doesn’t matter, the stitching will be hidden in the final seam.


Since the seams have already been pressed, top stitch as before: first at the outer folded edge, then again along the inside folded edge. Since the fabrics are overlapped instead of abutted, you end up with 4 layers of fabric in the seam.


You can see from my chalked marking that I got off ever so slightly, but this is a sample and a super unprofessional blog, so I didn’t feel compelled to re-do it.
It occurs to me that you could also mark 1/4″ on one SA, overlap the other fabric, baste, then press the seams after basting. Give it a go on some scraps and see what works for you.
Before you ask, I did try the first method (though not the second) on a curved edge in order to simulate the back crotch seam of jeans. I found that I had absolutely no issues with the curve. If anything it was easier because all the top stitching was closer to the edge of the fabric. When you press a curved edge to one side, the edge of the fabric is shorter than the line where you would be top stitching. You can clip the curve if you are faux flat-felling, but the seam will be inherently weaker. That’s not to say you’re in danger of splitting your jeans, but if there’s a better way I’m all for it. I hope you give this a try!
—lisa g.


